

|
|

 |
||||||||||||||||||||||||||||
|
How To Use SpaceFlag When you connect the battery to the SpaceFlag, a standard message ("SPACEFLAG FROM MADLAB") is programmed into the chip, but you can change this message to one of your own choice (up to 24 characters long, using the letters A to Z and the space character). You use the two pushbuttons on the board to do this. 1. First of all clear the original message from the chip's memory by waving the SpaceFlag a few times while holding down both pushbuttons. This clears the message to all spaces. 2. Now you can enter your new message, using the two pushbuttons to enter the individual characters that make up the message. The idea is to go through the letters in the alphabet until you reach the one you want. Pressing the pushbutton marked DOWN (the bottom pushbutton) moves you forward one position in the alphabet (for example from B to C). Pressing the pushbutton marked UP (the top pushbutton) moves you back one position in the alphabet (from F to E for example). You start from the space character, which is followed by the letter A (and preceded by the letter Z). In other words, pressing the DOWN pushbutton once gives you an A, pressing it twice gives you a B, and so forth. 3. Once you have reached the letter you want, press both pushbuttons together to fix the character in memory and STEP on to the next character in the message. Enter the next character in the same way, then step on again. Continue in this way until the whole message is entered. Just step over any characters you want left as spaces in your message. Note that you can't step back to the previous character, you must step all the way through the message and round again. When entering your message hold the SpaceFlag so that the left-hand edge is tilted slightly downwards. 4. When you have finished, just wave the SpaceFlag to read your message. A simple code is used to let you keep track of where you are in the alphabet. Different combinations of the seven lights (LEDs) being on, off or flashing represent all the letters of the alphabet. The first seven letters of the alphabet, the letters A to G, are represented by one light alone being continuously on. The letter A is represented by the top light on the board (LED1) being on, the letter B by the second light, and so on until G which is indicated by the bottom light (LED7) being on. The next six letters, H to M, are represented by a pair of lights being continuously on. The letter H is indicated by the top two lights being on, I by the second and third lights, and M by the bottom two lights being on. The second half of the alphabet uses the same arrangement as the first half, but this time the lights are flashing. The letters N to T are represented by a single flashing light, and the letters U to Z by a pair of flashing lights. Finally a space character is shown by all the lights being off. The table printed on the board (shown below) reminds you of this code. 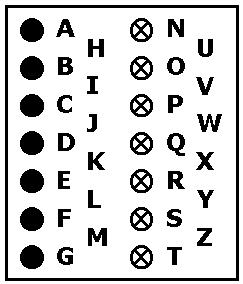
To save your batteries, the SpaceFlag will go to sleep when it is not being used (but it is a good idea to remove the batteries anyway when you will not be using it for any length of time). Press either pushbutton to re-awaken it. The SpaceFlag stores a 24-character message in its memory, which is displayed 10 characters at a time in a scrolling window. It works using the phenomenon of persistence of vision (in rather the same way a television works). As the SpaceFlag is waved in front of your eyes it paints a pattern of light which to your brain appears as a persistent, solid image. The SpaceFlag works best in the dark. It should be possible to read a message from many metres. In daylight, you might try pasting a piece of tissue paper over the LEDs to diffuse the light and make the message more readable. There is a certain knack to waving the SpaceFlag. A fluid motion from the wrist is best. With a little practice you will get to know the right speed to wave it. Construction Sheet | Schematic | Order Form |
||||||||||||||||||||||||||||
|
||||||||||||||||||||||||||||