| |
 |
|
CONSTRUCTION
STEP BY STEP |
|
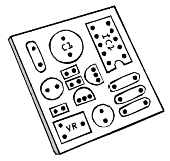
| In your kit you will find a printed circuit board and some components. Identify the individual components then follow these instructions for trouble-free construction. |
 |
CIRCUIT BOARDS
A printed circuit board has metal tracks on one side and pictures and lettering on the other. Components are fitted to the picture side of the board, and then soldered to the metal side. Soldering secures the component to the board and makes the electrical connection. |
 |
RESISTORS 

 |
Resistors have coloured bands around their bodies to indicate their values. The component sheet for a kit gives the colours for each resistor. |
| |
Bend the wire 'legs' on a resistor into a U-shape, then push the legs through the two holes in the board. |
| |
Resistors can be fitted either way around, and should be fitted flat on the board. |
|
DIODES 

| |
The positive leg of a diode is marked by a stripe around the body. |
| |
Bend the legs into a U-shape and fit the diode flat on the board, with the positive leg in the hole marked by a plus sign (+). |
|
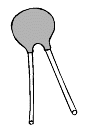
PIEZOS 
| |
Piezos can be fitted either way around. |
|
 |
VARIABLE RESISTORS 
| |
Variable resistors have three legs and can only be fitted in one way. |
|
 |
 |
CAPACITORS  
| |
Capacitors come in two types, electrolytic and non-electrolytic. |
| |
Non-electrolytic capacitors can be fitted either way around. |
| |
Electrolytic capacitors must be fitted the right way around. Put the shorter leg of an electrolytic capacitor (the negative leg) into the hole with the minus sign (–). |
| |
The negative leg is also marked by a stripe on the body of the capacitor. |
|
 |
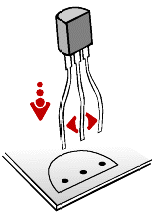 |
TRANSISTORS 
| |
Open the legs of a transistor apart enough to fit one leg through each of the three holes in the board. |
| |
Look at the transistor from above. Notice how the transistor is shaped like a half-circle. |
| |
Match the half-circle shape of the transistor to the half-circle shape on the board. In other words the flat side of the transistor should be facing towards the flat side of its picture. |
| |
Don't force the transistor all the way down. |
| |
Be careful not to get the legs twisted or crossed over. |
|
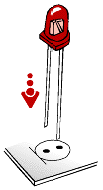
LEDS 
| |
An LED light has one leg slightly shorter than the other. Put the shorter leg into the hole with the line. |
| |
LEDs also have a slightly flattened edge on the rim on the same side as the shorter leg. |
|
 |
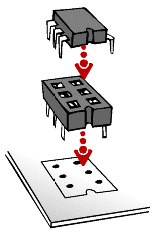 |
INTEGRATED CIRCUITS 
| |
Integrated circuits ('chips') are very delicate so they are not soldered directly to the board. Instead you solder a socket to the board, and then fit the chip into the socket. |
| |
Match the notch in one end of the chip socket to the notch in the picture on the board. Make sure that all the legs go through the holes in the board and that none of the legs are bent underneath the socket. Bend the legs a little outwards to keep the socket in place. |
| |
Take care when soldering as the legs are close together and it is easy for solder bridges to occur. (A solder bridge is where the solder runs over the gap between two tracks.) |
| |
Don't put a chip into its socket until the board has been finished and checked. |
| |
To fit the chip into its socket you will need to bend its legs a little inwards. Do this carefully with your fingers. Match the notch in one end to the notch in the socket. Make sure that a leg goes into each hole, then push the chip gently but firmly into place. |
| |
Never insert or remove a chip while the battery is connected. |
|
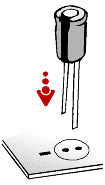
BATTERIES 
| |
To make the battery connection stronger, the battery snap leads are threaded through support holes in the board before being soldered. |
| |
Push the battery snap leads up through the larger holes in the board from the metal side of the board. |
| |
Fit the metal tip of the red lead into the BATTERY + hole, and the metal tip of the black lead into the BATTERY – hole. |
| |
Solder the metal tips to the tracks on the board, then pull the loops back. |
|
 |
 |
HOW TO SOLDER
SAFETY GOGGLES MUST BE WORN
ALL THE TIME WHEN SOLDERING |
|
 |
| |
Bend the legs of a component outwards a little after fitting it to the board to keep it in place until it's soldered. |
| |
| |
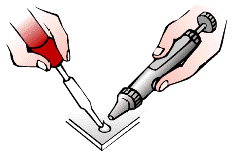
The order in which you fit and solder components to the board is not particularly important but in general you should solder the resistors first, then the capacitors. After that solder the transistors and finally the rest of the components. |
|
 |
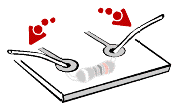
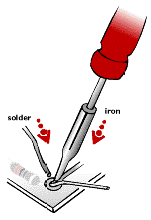
Hold the soldering iron like a pen. Hold it by the handle only. In your other hand hold a piece of solder. |
| |
Touch the tip of the iron against a component wire at the point where the wire comes through the board. |
| |
Wait a second or so while the wire heats up. |
| |
Touch the solder against the wire at the same time as the iron. Both the solder and iron must be as close as possible to the hole. |
| |
The solder will start to melt. Feed in more solder as it melts. |
| |
Remove the iron and solder when the hole is covered with solder. It only takes a few seconds to solder a joint. |
| |
Don't touch the component or allow it to move until the solder has cooled (a few seconds). |
| |
Put the soldering iron back in its stand in between use. |
| |
Always wash your hands after handling solder. |
|
 |
 |
| |
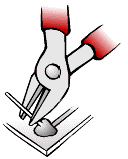
Trim the legs of a component after it has been soldered. Clip the legs close to each solder joint. |
| |
Don't fit and solder too many components before clipping their legs. Avoid soldering together the legs of components next to each other. |
| |
Remember to wear goggles when clipping wires. |
|
| |
Use the right amount of solder. Too little and it may not form a good joint. Too much and it may cause a short circuit. A good solder joint covers the solder pad and component wire completely and is smooth and shiny. |
| | This is what a good joint looks like. |
 |
| |
| |
A joint which is badly soldered is called a 'dry' joint. These are some examples: |
| | The joint is cratered and dull or grainy looking. |
 |
| | The solder has not spread over the pad properly. |
 |
| | A spike of solder means that the joint has been overheated. |
 |
|
 |
 |
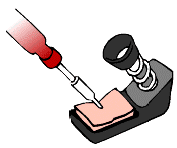
Clean the tip of the hot soldering iron
from time to time on a DAMP sponge. |
If you make a mistake use a solder sucker
to remove the solder. |
 |
 |
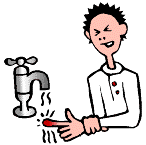
Treat any burns IMMEDIATELY with
cold running water for ten minutes. |
MadLab runs a repair service for kits.
Contact us if you can't get your kit to work. |
TROUBLESHOOTING | |
(WHAT TO DO IF IT DOESN'T WORK) |
| |
Carefully check that the components are fitted correctly. Check that all the components are in the right place. |
| |
Check the colours of resistors against the component sheet, it is easy to mix them up. Pay particular attention to electrolytic capacitors, LEDs and battery snaps. Are they the right way around? |
| |
Check that transistors haven't been soldered into the board backwards. |
| |
Check all your soldering. A good solder joint looks shiny and smooth and covers the hole completely. |
| |
Hold your board up to the light. If any light shows through a hole then more solder is needed. |
| |
Check that large blobs of solder are not causing short circuits, particularly with chip sockets. If too much solder has been used it is often better to remove it completely using a solder sucker and then to re-solder. |
| |
Also check for streaks of solder bridging tracks, and any hairline cracks in tracks. Hairline cracks can be repaired by soldering over the gap. |
|
Note: this document is also available in pdf format if you wish to print it out.
|