
|
|

 |
||||||||||||||||||||||||||||
|
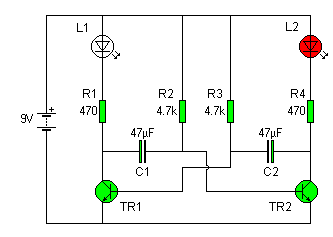
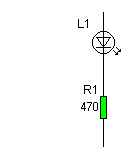
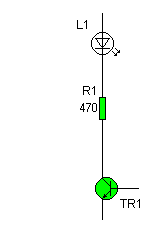
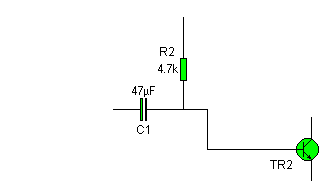
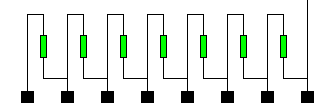
LESSON 7 - PUTTING IT ALL TOGETHER Now it's time to put together everything you've learnt so far. It's time to understand how a complete circuit works. Let's look at the simplest MadLab kit - Flashing Lights. This is an example of a very common type of electronic circuit - an oscillator. Here's the complete circuit diagram of Flashing Lights. It's complicated but don't panic. Let's simplify things by taking the circuit a bit at a time. First of all let's look at one of the LEDs. If you connected an LED straight across a 9V battery it would be destroyed. Too much current would flow through it, so you have to limit the current in some way. You can do this by connecting a resistor in series with the LED (in series just means in a line with). In the above circuit R1 and R4 are the series resistors for the two LEDs, L1 and L2. Now we have a way of lighting up the LEDs we need some means of switching them on and off when we want. This is what the transistors do. The first transistor (TR1) controls the first LED (L1), and the second transistor (TR2) controls the second LED (L2). Ok, so the transistors switch the LEDs on and off. But what decides when the transistors do this? The answer is to see what components are connected to the bases of the transistors. Recall that when the voltage on the base of a transistor reaches a certain level the transistor switches on. So let's see what affects the voltage on the transistor bases. It must be the two capacitors, C1 and C2. Here's a relevant part of the circuit. The two resistor-capacitor pairs (R2-C1 and R3-C2) are the timing components of the circuit. They control how fast the lights flash. As each capacitor charges up the voltage on the base of the opposite transistor changes and at some point it reaches a voltage sufficient to switch the transistor on. The time taken for a capacitor to charge through a resistor depends both on the value of the capacitance and the value of the resistance. A bigger capacitor will take longer to charge, a bigger resistor will slow the current down and also take longer to charge. The flash rate depends on the time taken. Consider the circuit in its entirety again. The complete circuit acts like a seesaw. It has two states and it oscillates between them. First one transistor-LED pair are switched on while one capacitor charges. When charged it switches the other transistor on which lights up its LED. The first transistor-LED pair switch off, the first capacitor discharges and the second capacitor starts charging. When this capacitor is charged it switches the first transistor-LED pair back on and discharges itself. Now the circuit is back where it started and the whole sequence can repeat. It cycles over and over with the two lights flashing alternately for as long as the battery is connected. That's pretty much all there is to a (slightly simplified) explanation of how Flashing Lights works. There are some subtleties and complications at work here which we won't go in to. Just grasp the idea of capacitors charging and discharging in sequence and switching transistors and LEDs on and you've basically got it. You may have noticed that the flash rate speeds up as the battery dies. This is because the voltage drops below 9V as a battery comes to the end of its life. When this happens the capacitors are charging up to a lower voltage. This takes less time, so the circuit oscillates faster. Wonky Wire & Bagpipes Now you understand the Flashing Lights circuit you are in a position to understand Wonky Wire and Bagpipes as well. The circuit is essentially the same for all three kits. They're all oscillators, the only difference is how fast they oscillate. The capacitances in Wonky Wire and Bagpipes are thousands of times smaller than the capacitance in Flashing Lights so the circuit oscillates thousands of times faster (because it takes less time to charge up a smaller capacitor). Instead of a pair of lights these circuits are fitted with piezo speakers which convert the electrical oscillations into sound oscillations which we can hear. In Wonky Wire the wand and the wire just form the on/off switch for the circuit. When they touch together the oscillator starts up and makes a beep. That's all there is to it. The Bagpipes is basically the same. Touching the keyboard with the stylus turns the circuit on, but this time there are a number of different points that can be touched. Each point in the keyboard switches in a different resistance. This resistance controls the speed of the oscillator which translates into the pitch of the tone you hear. The keyboard resistors are arranged in a chain. You tap into the chain at different points depending on which resistor you touch. The resistances all add up, so selecting a point in the chain selects a different total resistance. This changes the rate of oscillation and hence the pitch of the tone. There is also a preset (variable resistor) in series with the keyboard resistors. This sets the basic frequency of oscillation of the circuit and can be used to 'tune' the Bagpipes. Congratulations, you've reached the end of MadLab's Rough Guide to Electronics. We hope you've enjoyed learning a little about the wonderful world of electronics, and you now have a better understanding of how the MadLab kits work. Maybe soon you'll be designing your own circuits.... CONTENTS |
||||||||||||||||||||||||||||
|
||||||||||||||||||||||||||||